Find and manage duplicate files across local and network volumes.
Media production workflows generate duplicates constantly. Project imports copy source footage into new timelines. Archive passes duplicate deliverables across volumes. Multi-editor environments scatter identical assets across shares and local caches. On shared storage, every duplicate consumes capacity your team can't use for new work.
DupeCheck is designed for environments where duplicate management needs to span network volumes, reach outside the user sandbox, and handle large file counts efficiently — the scenarios that matter most in media production and that sandboxed App Store tools can't address.
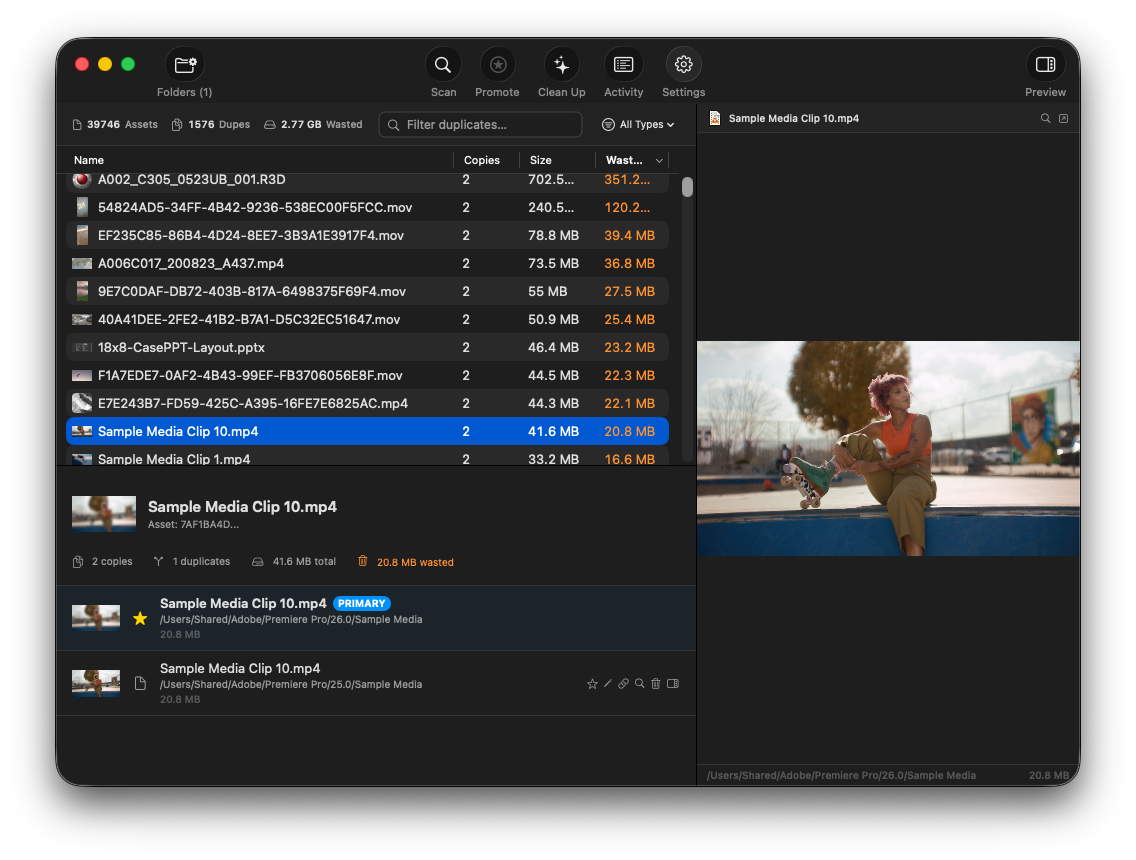
Main window showing duplicate groups sorted by wasted space, with file preview panel on the right.
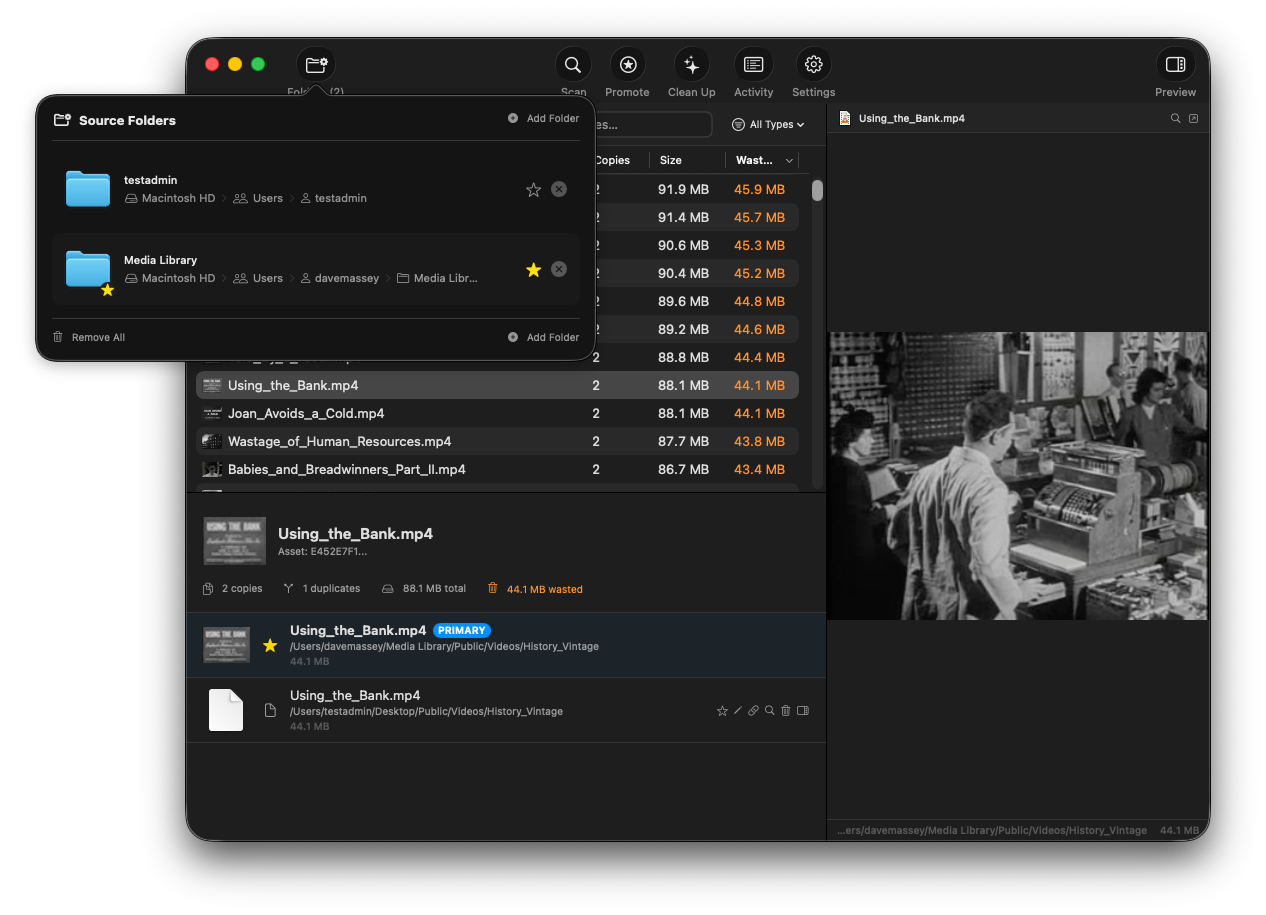
Source folder management — add local and network volumes, designate a primary folder.
Click the source folder button in the toolbar to add folders. You can add any combination of local directories and network-mounted volumes. DupeCheck scans all source folders and finds duplicates across them.
If one source folder is a child of another, the child is automatically excluded from the parent's scan to prevent double-counting. If you remove the child folder later, the parent automatically rescans to pick up files it was previously skipping.
Designating a folder as primary tells DupeCheck which copy to keep during cleanup. When duplicates exist across folders, the copy in the primary folder is preserved and duplicates in other folders are cleaned up.
You can also use Promote from Primary to batch-promote all files in the designated folder to primary status — useful when one folder is your canonical source and everything else is a copy.
DupeCheck uses a multi-phase approach to find duplicates efficiently without hashing every file on disk:
Before any cleanup operation, DupeCheck can re-verify that files are truly identical using a cryptographic hash. This is configured in Settings:
Cryptographically strong verification. Hardware-accelerated on Apple Silicon for fast performance even on large files.
Alternative verification method. Faster on older hardware but less collision-resistant than SHA-256.
Skip verification before cleanup. Fastest, but relies on the multi-sample hash from the initial scan. Use only when speed is critical and you trust the scan results.
DupeCheck uses concurrent workers for both directory enumeration and file hashing. The default configuration (2 enumeration workers, 4 hash workers) balances speed with I/O pressure on the volume being scanned.
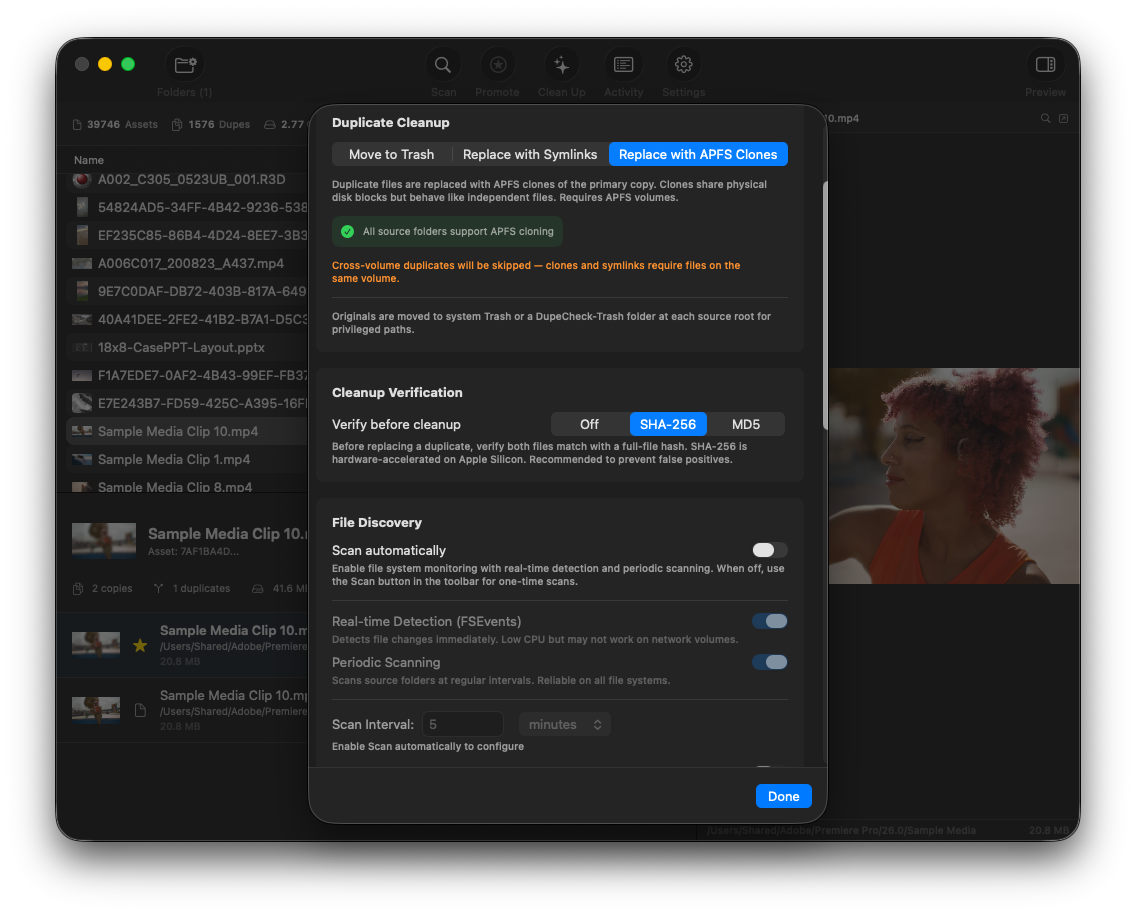
Three cleanup modes: APFS Clones, Symlinks, and Move to Trash.
DupeCheck offers three strategies for handling confirmed duplicates. Choose the mode that best fits your storage and workflow:
The duplicate is replaced with an APFS clone of the primary copy. Clones share physical disk blocks but behave as completely independent files — applications see two separate files, but the underlying storage is shared. If either file is later modified, only the changed blocks are written (copy-on-write).
DupeCheck preserves the duplicate's original metadata (modification date, permissions, extended attributes) through an atomic clone-swap operation. The original file's inode is preserved, so references from other applications remain valid.
The duplicate is replaced with a symbolic link pointing to the primary copy. This saves space without requiring APFS, but symlinks are visible to applications and may not work with all software. DupeCheck uses a safe rename-verify-move pattern to ensure atomic replacement.
Like clone mode, symlinks require both copies to be on the same volume. Cross-volume duplicates are skipped automatically.
Duplicate files are moved to the system Trash. This is the simplest option —
duplicates are removed but recoverable from Trash if needed. For privileged paths
where the system Trash is unavailable, DupeCheck creates a DupeCheck-Trash
recovery folder at the source root.
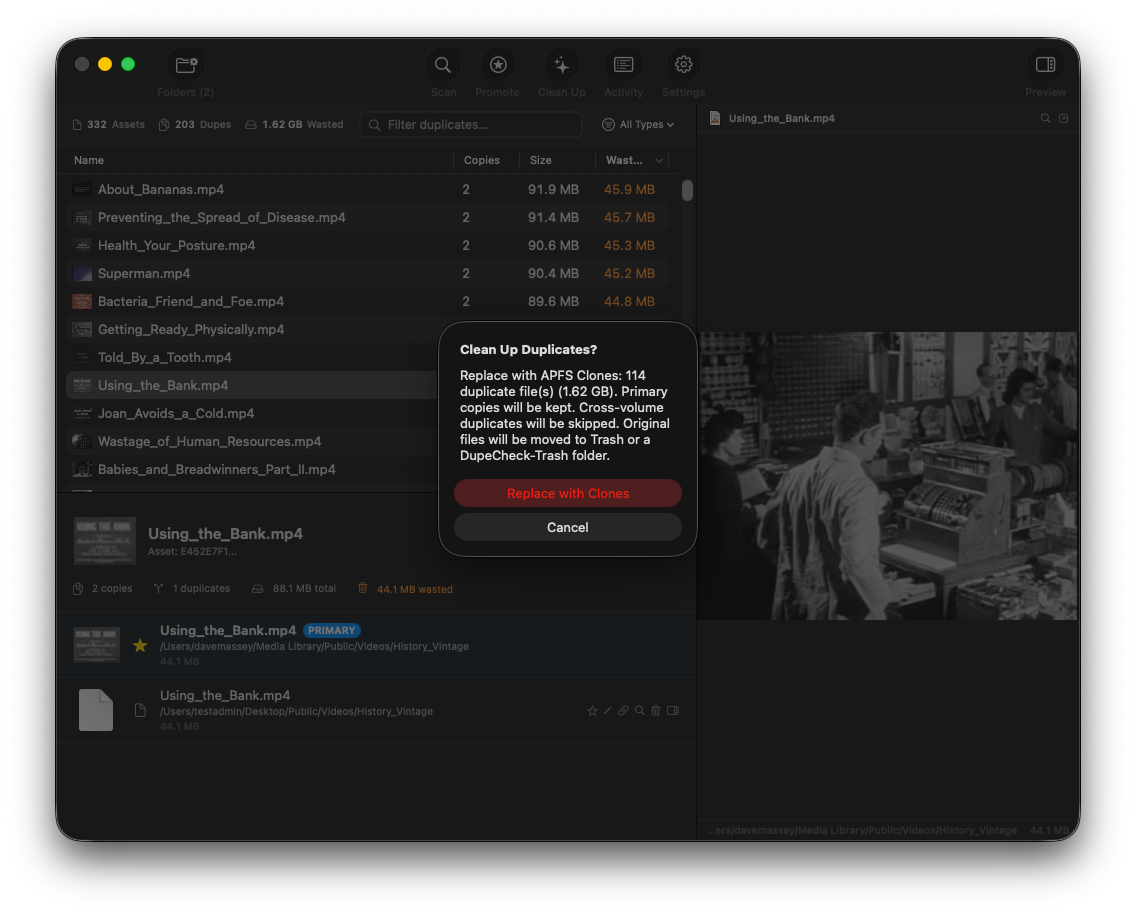
Cleanup confirmation — review mode, file count, and recovery options before any files are modified.
DupeCheck protects certain files from cleanup regardless of mode:
DupeCheck can continuously monitor source folders for new duplicates using the Start Watching / Stop Watching toolbar button. When watching is active, macOS FSEvents detects file changes in near real-time with intelligent debouncing to batch event bursts. The watching state persists across app launches.
Changes you make from within DupeCheck — cleaning, renaming, or cloning duplicates — update the UI immediately without waiting for a rescan, regardless of whether watching is enabled.
In addition to (or instead of) real-time watching, you can enable Periodic Scanning in Settings for interval-based rescans. This is reliable on all filesystems including network volumes where FSEvents may not work. Default interval is 5 minutes, configurable from 30 seconds upward.
Optionally set a specific time of day for scans to begin. This is useful in production environments where you want scans to run during off-hours to avoid competing with active editing sessions for storage I/O.
DupeCheck supports full keyboard navigation. Press Tab to switch focus between the duplicate groups table and the file list below it. Use Up/Down arrows to navigate within the focused pane. The active pane is indicated by an accent-colored border.
| ⌘C | Copy Filename |
| ⌥⌘C | Copy Path |
| ⌘R | Reveal in Finder |
| ⌘E | Rename |
| ⌘P | Promote to Primary |
| ⌘⌫ | Clean Selected Duplicate |
| ⌘↑ / ⌘↓ | Previous / Next Group |
| ⌥⌘↑ / ⌥⌘↓ | Previous / Next File |
| Space | Toggle Preview |
| Tab | Switch between Groups and Files |
All shortcuts are also shown in context menus for discoverability. Destructive actions show a confirmation dialog which can be suppressed via Don't Ask Again. Use Reset Dialogs in Advanced settings to re-enable suppressed confirmations.
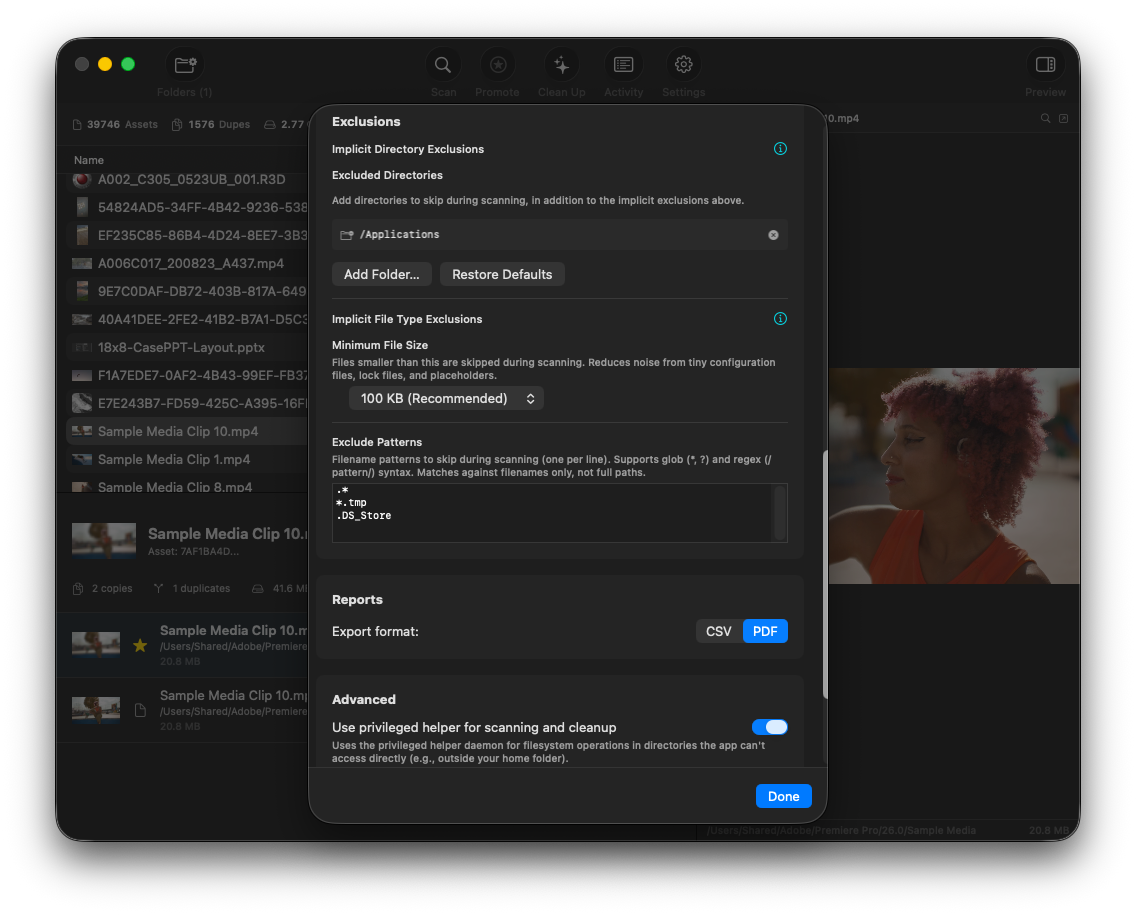
Exclusion settings with implicit system protections, user-configured directories, and pattern-based filtering.
The following directories are always excluded from scanning. These are detected automatically based on filesystem metadata and cannot be disabled:
com.apple.rootless extended attribute
Add directories to the exclusion list in Settings to skip them during scanning.
The /Applications directory is excluded by default.
Define filename-based exclusion patterns using glob syntax (*,
?) or regex (/pattern/). Patterns match against filenames
only, not full paths. One pattern per line. Default patterns:
.* — hidden files (dotfiles)*.tmp — temporary files.DS_Store — Finder metadataFiles below the minimum size threshold are skipped during duplicate detection. The default of 100 KB is recommended — smaller files are rarely meaningful duplicates in media workflows and skipping them significantly reduces scan time. Options range from no minimum to 10 MB.
By default, DupeCheck can only scan and modify files within your home folder. To operate on files outside your home directory — including shared volumes, system-wide locations, and other users' directories — enable the privileged helper in Settings.
The helper status indicator in Settings shows green when the helper is running and ready, or orange when approval is still pending.
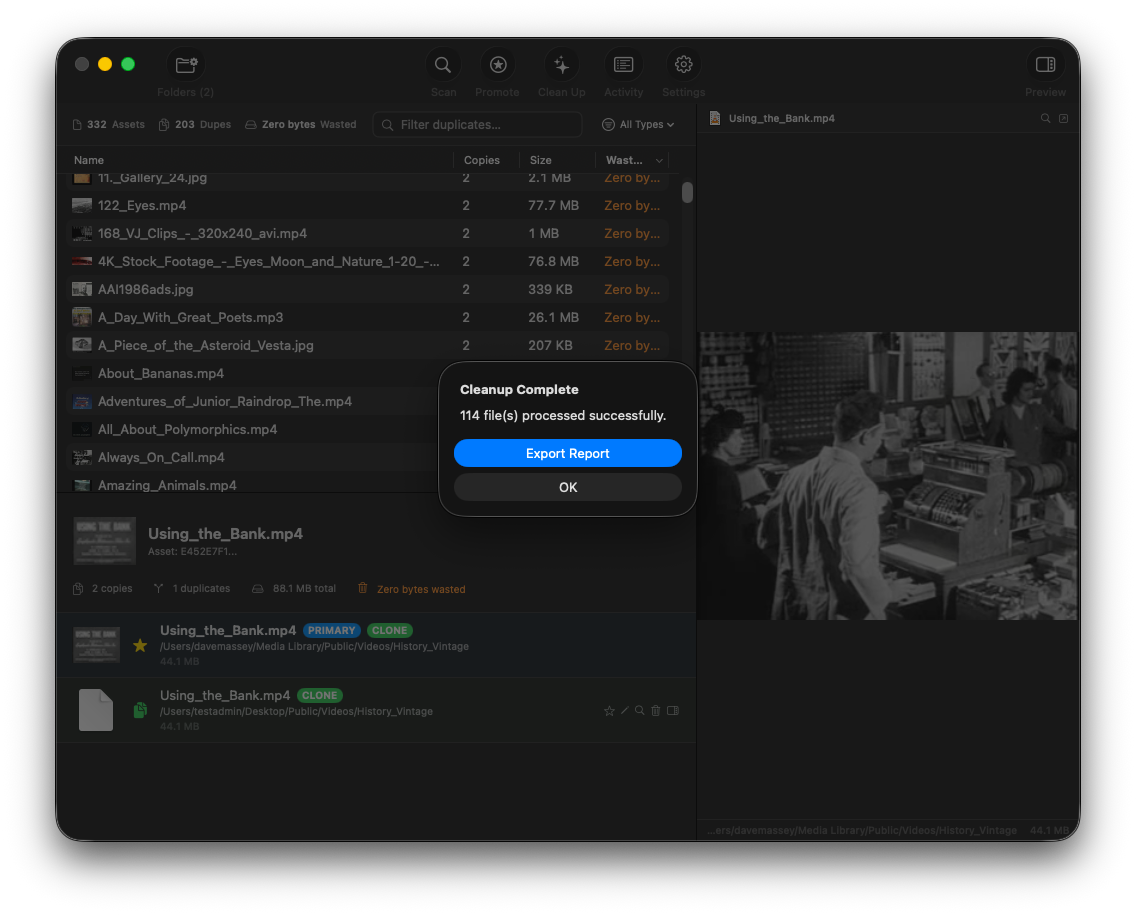
Export a cleanup report after each operation for documentation or audit purposes.
After each cleanup operation, DupeCheck offers to export a report documenting what was processed. Reports include per-file status, the action taken, recovery paths, and summary statistics.
Machine-readable format with columns for status, action, file path, primary path, error message, file size, recovery path, and timestamp. Includes a summary footer with counts for succeeded, failed, and skipped files.
Printable report with title page, summary statistics, and per-file detail pages with color-coded status (green for success, orange for skipped, red for failed).
The report captures every file processed during cleanup, including:
APFS clone and symlink modes only work when both copies are on the same volume. Cross-volume duplicates are automatically skipped in these modes. If most of your duplicates span volumes, use Move to Trash mode instead.
In Trash mode, cleaned files are in your system Trash (recoverable
via Finder → Trash). For privileged paths where system Trash is unavailable,
look for a DupeCheck-Trash folder at the root of each source folder.
In Clone mode, both copies still exist — they just share physical storage blocks. The file at each path is fully functional and independently modifiable.
If cleanup reports files as busy, DupeCheck checks whether the busy flag has been idle for more than 24 hours. Stale busy flags (common with SMB oplocks that weren't properly released) are automatically cleared before retrying the operation.
If the file index becomes corrupted or you want to start fresh, use Reset Database in Settings → Advanced. This clears all scanned file records and requires a full rescan. Your source folder configuration and preferences are preserved.
Enable Debug Logging in Settings → General for verbose
diagnostic output. Logs are written to ~/Library/Logs/daveco/ and
include scan progress, hash computations, cleanup operations, and error details.